• Home
  • Class Policy
  • Curriculum
    • Getting Started >
      • What is Graphics?
      • Course Syllabus
      • Copyright
      • Layout Sequence
      • Time Sheets
      • Survey
    • Type >
      • Type Lesson
      • Typeface Search
      • Type Study Guide
      • Typeface Search Cover
      • Typography Assignment
      • Personifying a Word >
        • Brainstorming
        • Thumbnails
        • Rough
        • Making the Vector
        • Turning in the Project
    • Illustrator >
      • What are Pixels
      • What is resolution?
      • Illustrator Dog
      • Rasters vs. Vectors
      • Practice Vector
      • Illustrator Vector
      • Vectoing Issues
      • Vector Touchups
      • Saving, Printing, and Emailing
    • Screen Printing >
      • Syllabus & Assignment
      • Thumbnails
      • Rough
      • Comprehensive
      • Degreasing a Screen
      • Coating a Screen
      • Exposing a Screen
      • Washing out a Screen
      • Patching Pinholes
      • Blocking Out
      • Cutting Paper to Print on
      • Printing Color 1
      • Printing Other Colors
      • Reclaiming a Screen
      • Choosing Keepers
      • Matting a Print
      • Submitting for Grading
    • Notepad >
      • Assignment & Syllabus
      • Thumbnails
      • Rough
      • Using a Scanner & Photoshop
      • Comprehensive
      • Making a 4-Up
      • Printing a Proof Sheet
      • Choosing Paper
      • Printing Your Notepad
      • Cutting Notepads
      • Padding
      • Final Trim
      • Mounting
      • Submitting for Grading
    • Vinyl Decal & Logo >
      • Brainstorming & Thumbnails
      • Making a Rough
      • Comprehensive (Vectoring)
      • Making the Decal Template
      • Adding the Graphics & Logo
      • Using Space
      • Uploading a Photo
      • Downloading an Image from Drive
      • Making a Practice Selection
      • Saving & Emailing the Decal
      • Appying the Decal
    • Principles of Design >
      • Ad Critique Assignment >
        • Scanning Your Ad
        • Straightening as Ad
        • Cropping the Ad
        • Making a Screen Recording
      • Vinyl Jacket Project >
        • Vinyl Layout in Illustrtor
        • Vinyl Layout Thumbnails
        • Vinyl Layout Rough
        • Making a Bar Code
        • Adding & Rescaling Items
        • Printing, Trimming & Assembling
        • Turning in the Project
      • Advertisement (Cyber Only) >
        • Unique Selling Point
        • Advertisement Thumbnails
        • Advertisement Rough
        • Taking a Photo
        • Getting Photos to the Computer
        • Downloading an Image from Drive
        • Making a Cut Out
        • Compose your Graphics
        • Assembling in InDesign
        • Critiquing your Advertisement
        • Turning in the Project
  • Links
    • NHS
    • NESD
    • Sapphire
    • Mr. Tate's Page
    • Student Google
    • NHS Graphics
  • Graphics Schools
  • Contact
  • Vocab
  • Standards
Vinyl Layout Rough
Following the same layout process that we've done all marking period, the next step is to choose the idea(s) that you like from the thumbnail sketches and turn them into a rough. Since the rough is drawn to scale, you'll need to print the vinyl layout that you previously made in InDesign. When printing, check to make sure the document is printing on the correct size paper or the layout will be cutoff. The video below will explain this.
P. O. D. 
​
Principles of Design
Ad Critique Assignment
   Scanning your Ad

   Straightening an Ad
​   Cropping the Ad
​   Making a Screen Recording
Vinyl Jacket Project
   Vinyl Layout in Illustrator
   Vinyl Layout Thumbnails
   Vinyl Layout Rough
   Making a Bar Code
   Adding & Rescaling Items
   Printing, Trimming, & Assembly
   Turning in the Project
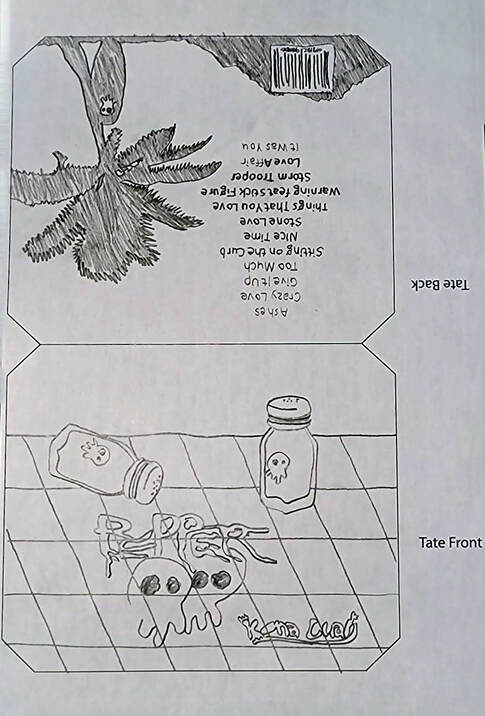
With the printed rough in hand, now grab a pencil and start sketching your ideas. Remember that it doesn't have to be perfect but all text should be written out, you'll need to include the band/artist name and album title as well as at least 10 tracks and the barcode. Somewhere on the cover you'll want to add the logo for the artist as well. Take your time and think it through! Your thoughtful design will be your guide as you begin to create this on the computer. A well thought out rough means less trial and error in the software! Check out the rough below.
Picture
Powered by Create your own unique website with customizable templates.