• Home
  • Class Policy
  • Curriculum
    • Getting Started >
      • What is Graphics?
      • Course Syllabus
      • Copyright
      • Layout Sequence
      • Time Sheets
      • Survey
    • Type >
      • Type Lesson
      • Typeface Search
      • Type Study Guide
      • Typeface Search Cover
      • Typography Assignment
      • Personifying a Word >
        • Brainstorming
        • Thumbnails
        • Rough
        • Making the Vector
        • Turning in the Project
    • Illustrator >
      • What are Pixels
      • What is resolution?
      • Illustrator Dog
      • Rasters vs. Vectors
      • Practice Vector
      • Illustrator Vector
      • Vectoing Issues
      • Vector Touchups
      • Saving, Printing, and Emailing
    • Screen Printing >
      • Syllabus & Assignment
      • Thumbnails
      • Rough
      • Comprehensive
      • Degreasing a Screen
      • Coating a Screen
      • Exposing a Screen
      • Washing out a Screen
      • Patching Pinholes
      • Blocking Out
      • Cutting Paper to Print on
      • Printing Color 1
      • Printing Other Colors
      • Reclaiming a Screen
      • Choosing Keepers
      • Matting a Print
      • Submitting for Grading
    • Notepad >
      • Assignment & Syllabus
      • Thumbnails
      • Rough
      • Using a Scanner & Photoshop
      • Comprehensive
      • Making a 4-Up
      • Printing a Proof Sheet
      • Choosing Paper
      • Printing Your Notepad
      • Cutting Notepads
      • Padding
      • Final Trim
      • Mounting
      • Submitting for Grading
    • Vinyl Decal & Logo >
      • Brainstorming & Thumbnails
      • Making a Rough
      • Comprehensive (Vectoring)
      • Making the Decal Template
      • Adding the Graphics & Logo
      • Using Space
      • Uploading a Photo
      • Downloading an Image from Drive
      • Making a Practice Selection
      • Saving & Emailing the Decal
      • Appying the Decal
    • Principles of Design >
      • Ad Critique Assignment >
        • Scanning Your Ad
        • Straightening as Ad
        • Cropping the Ad
        • Making a Screen Recording
      • Vinyl Jacket Project >
        • Vinyl Layout in Illustrtor
        • Vinyl Layout Thumbnails
        • Vinyl Layout Rough
        • Making a Bar Code
        • Adding & Rescaling Items
        • Printing, Trimming & Assembling
        • Turning in the Project
      • Advertisement (Cyber Only) >
        • Unique Selling Point
        • Advertisement Thumbnails
        • Advertisement Rough
        • Taking a Photo
        • Getting Photos to the Computer
        • Downloading an Image from Drive
        • Making a Cut Out
        • Compose your Graphics
        • Assembling in InDesign
        • Critiquing your Advertisement
        • Turning in the Project
  • Links
    • NHS
    • NESD
    • Sapphire
    • Mr. Tate's Page
    • Student Google
    • NHS Graphics
  • Graphics Schools
  • Contact
  • Vocab
  • Standards

Cutting Notepads

Picture
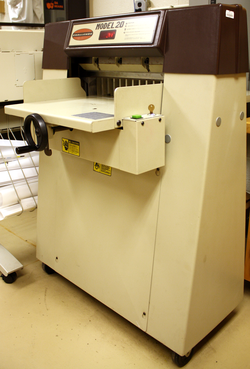
With your notepads now printed, it's time to cut the notepads apart. Since there are 4 per sheet, you'll have to separate them so that we can make one large stack of individual sheets.Rather than cutting each sheet individually with scissors or a paper cutter, you can use the hydraulic paper cutter to cut the entire stack at once. Just be careful, if you miss-cut the paper, there is nothing that we can do to fix it. I would recommend setting up the paper cutter and cutting your proof sheet first to avoid accidents. If you ruin the proof, it's all good. Also, only one person should operate the paper cutter at a time. If only one person is using it, there is no way to injure yourself. It is easily the most dangerous piece of equipment in the room, so be careful with it!

The video below will walk you through the process of cutting your prints.

Notepad

    Assignment & Syllabus
    Thumbnails
    Rough
    Comprehensive
    Scanning & Photoshop
    Making a 4-Up
    Printing a Proof Sheet
    Choosing Paper
    Printing Your Notepad
    Cutting Notepads
    Padding
    Final Trim
    Mounting
    Submitting for Grading
The video references some things that it does not show. Below you will find still pictures of the wing bolt by the adjustment wheel, the cabinet with the scrap paper for cutting, and the mat board for the backing.
Also, before you can move on to padding your notepads, you'll need a back for your notepad. When you purchase a notepad or notebook, the last sheet is always cardboard to add stability. For this we will use any color of railroad board which you can find on the opposite side of the paper cutter, in the cabinets under the mat cutter. Choose the color that you would like to use and cut it down to the size of your notepad using the manual paper cutter.

The hydraulic paper cutter is great for large stacks of paper, but not for one sheet, so you'll need to use the manual paper cutter. When you're using the manual cutter, always keep one hand on the blade handle and the other hand behind the red safety line. To make sure that your cuts are straight, keep the mat board on or parallel to the lines. If you don't your lines will be crooked!
Powered by Create your own unique website with customizable templates.