• Home
  • Class Policy
  • Curriculum
    • Getting Started >
      • What is Graphics?
      • Course Syllabus
      • Copyright
      • Layout Sequence
      • Time Sheets
      • Survey
    • Type >
      • Type Lesson
      • Typeface Search
      • Type Study Guide
      • Typeface Search Cover
      • Typography Assignment
      • Personifying a Word >
        • Brainstorming
        • Thumbnails
        • Rough
        • Making the Vector
        • Turning in the Project
    • Illustrator >
      • What are Pixels
      • What is resolution?
      • Illustrator Dog
      • Rasters vs. Vectors
      • Practice Vector
      • Illustrator Vector
      • Vectoing Issues
      • Vector Touchups
      • Saving, Printing, and Emailing
    • Screen Printing >
      • Syllabus & Assignment
      • Thumbnails
      • Rough
      • Comprehensive
      • Degreasing a Screen
      • Coating a Screen
      • Exposing a Screen
      • Washing out a Screen
      • Patching Pinholes
      • Blocking Out
      • Cutting Paper to Print on
      • Printing Color 1
      • Printing Other Colors
      • Reclaiming a Screen
      • Choosing Keepers
      • Matting a Print
      • Submitting for Grading
    • Notepad >
      • Assignment & Syllabus
      • Thumbnails
      • Rough
      • Using a Scanner & Photoshop
      • Comprehensive
      • Making a 4-Up
      • Printing a Proof Sheet
      • Choosing Paper
      • Printing Your Notepad
      • Cutting Notepads
      • Padding
      • Final Trim
      • Mounting
      • Submitting for Grading
    • Vinyl Decal & Logo >
      • Brainstorming & Thumbnails
      • Making a Rough
      • Comprehensive (Vectoring)
      • Making the Decal Template
      • Adding the Graphics & Logo
      • Using Space
      • Uploading a Photo
      • Downloading an Image from Drive
      • Making a Practice Selection
      • Saving & Emailing the Decal
      • Appying the Decal
    • Principles of Design >
      • Ad Critique Assignment >
        • Scanning Your Ad
        • Straightening as Ad
        • Cropping the Ad
        • Making a Screen Recording
      • Vinyl Jacket Project >
        • Vinyl Layout in Illustrtor
        • Vinyl Layout Thumbnails
        • Vinyl Layout Rough
        • Making a Bar Code
        • Adding & Rescaling Items
        • Printing, Trimming & Assembling
        • Turning in the Project
      • Advertisement (Cyber Only) >
        • Unique Selling Point
        • Advertisement Thumbnails
        • Advertisement Rough
        • Taking a Photo
        • Getting Photos to the Computer
        • Downloading an Image from Drive
        • Making a Cut Out
        • Compose your Graphics
        • Assembling in InDesign
        • Critiquing your Advertisement
        • Turning in the Project
  • Links
    • NHS
    • NESD
    • Sapphire
    • Mr. Tate's Page
    • Student Google
    • NHS Graphics
  • Graphics Schools
  • Contact
  • Vocab
  • Standards

Padding Notepads

Picture
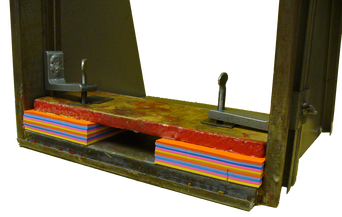
Next we will pad your prints so that they are all attached. Place the mat board on the bottom of the stack, pull one sheet out and put it in your folder (for mounting) and follow the steps on the handout. It's really rather easy to pad paper, just make sure that the paper is jogged and even and has several thick coats. It's best to have at least 4 people pad at the same time if possible.

The video below will explain the process.

Notepads

    Assignment & Syllabus
    Thumbnails
    Rough
    Comprehensive
    Scanning & Photoshop
    Making a 4-Up
    Printing a Proof Sheet
    Choosing Paper
    Printing Your Notepad
    Cutting Notepads
    Padding
    Final Trim
    Mounting
    Submitting for Grading
Picture
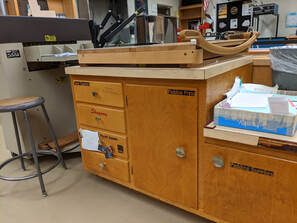
The video references the cabinet where the supplies are kept. You can find them under the manual paper cutter. This photo shows the cabinet the I'm referring to. You'll find the press in the larger cabinet under the paper cutter and the cement and brush in the small square cabinet to it's right.

Powered by Create your own unique website with customizable templates.